
Clone a backup of one BinaryLane server onto another existing server in the same account. The source supplies the operating system and disk contents; the destination keeps its own IP address and has its disks overwritten.
TABLE OF CONTENTS
- Before you begin
- 1. Create a backup of Server-B
- 2. Select Server-A as the destination
- 3. Check Server-A
- Related instructions
Before you begin
This guide uses the current BinaryLane control panel and two servers in the same account:
- Server-A is the destination: the server whose disks will be overwritten.
- Server-B is the source: the server whose backup supplies the operating system and disk contents to copy onto Server-A.
In this example, Server-A starts with Ubuntu 24.04 and Server-B has Ubuntu 26.04. Both have a 20 GB disk. After cloning, Server-A runs the Ubuntu 26.04 installation from Server-B's backup and keeps its own IP address.
Have both servers built and available before starting. If you are cloning to retain an IP address, select the server that already holds that address as the destination. Do not cancel it and create a replacement expecting to receive the same IP address.
Back up Server-A before cloning
Cloning replaces Server-A's existing disks and interrupts its service. Before continuing, create a backup of Server-A or confirm that you already have a suitable backup of the data you need from it. Server-B's backup supplies the new contents; it does not protect the existing contents of Server-A. Check the destination hostname and IP carefully: this is the server that will be overwritten.
1. Create a backup of Server-B
- Open Server-B, then select Backups and the Create tab.
- Set Backup Will to Create a new Temporary image (a temporary backup is removed 7 days after it is taken, so complete the clone within that time).
- Enter a recognisable label, such as Server-B Ubuntu 26.04, then select Create Backup Now.
- Wait for the backup to finish. In Manage, select that backup and choose Clone....
The clone uses the contents captured in this backup, not changes made to Server-B afterwards. If applications write data continuously, arrange an application-consistent backup before cloning.
2. Select Server-A as the destination
- Check that Clone from (Source) identifies Server-B and the backup you intend to use.
- Under Clone to (Destination), select Server-A. Check its hostname and IP address against the destination you intend to overwrite.
- Check the Hostname field. Selecting Server-A fills it with that server's hostname; leave it unchanged if you want to keep that name.
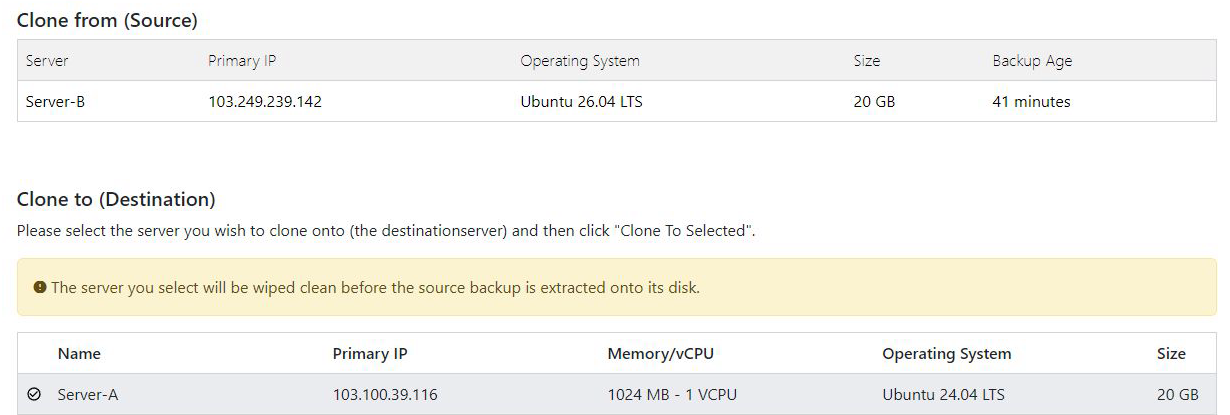
Before you clone
Selecting Clone To Selected starts the operation without another confirmation dialog. It overwrites Server-A's disks. Confirm the selected destination and your backups before clicking it.
- Select Clone To Selected, then open Server-A's Overview to follow progress. Wait for cloning and startup to finish.
3. Check Server-A
- Confirm that Server-A has kept its original IP address.
- Check that it is running, then connect and confirm the expected operating system, files and applications are present.
- Test your services using Server-A's address. Review any application settings that refer to Server-B's hostname or IP address.
In our example, Server-A's console shows Ubuntu 26.04 after cloning, and the panel's operating-system label also changes to Ubuntu 26.04. Its IP address stays the same. Keep Server-B until you have verified the result and decided which servers and backups you still need.
Existing destination backups
Backups already belonging to Server-A remain after cloning. Unlocked backups continue to be replaced according to the normal backup schedule; locked backups remain protected until unlocked.