
Connect two BinaryLane servers over a private network while keeping their public internet connections. This guide uses a Virtual Private Cloud (VPC) with Dedicated Interface, also called Split NICs: one network interface for public traffic and another for VPC traffic.
VPCs are free. There is no cost for the VPC itself; you pay only for the servers.
You can create servers in the VPC or move existing servers into it. The Ubuntu configuration below covers an unconfigured private interface on Ubuntu 26.04 using Netplan.
Prefer the API or CLI? Follow Create a server in a VPC using the BinaryLane API or CLI, then return to the private-interface configuration below.
Allow for service interruption
Moving an existing server into a VPC reboots it. Enabling Dedicated Interface is a separate change that also interrupts the server while it shuts down and starts again. Schedule these changes for a maintenance window and have mPanel console access available.
TABLE OF CONTENTS
- Before you begin
- Applies to
- Create or select a VPC
- Add your servers
- Configure the private interface
- Check the connection
- Troubleshooting
- Create with the API or CLI
Before you begin
You need two servers in your account, access to mPanel, and administrator access inside both servers. New servers incur charges; check the plan and options before creating them.
- Choose a private address range that does not overlap networks you intend to connect, including your home or office network if you later add a VPN.
- For existing servers, record the current addresses, routes and DNS settings, keep a backup, and check that you can use the console under Remote Access.
- The example uses
10.241.0.0/24, with10.241.0.4and10.241.0.5assigned to the two servers. Use the addresses actually assigned in your account, not these example addresses.
Applies to
- Servers with public IPv4 access and Dedicated Interface in the same VPC
- Ubuntu 26.04 using Netplan with systemd-networkd for the guest commands
Image revisions, older installations and custom configuration can differ. Do not apply this configuration to a NAT-only, single-interface server or to an interface already managed by another configuration.
Create or select a VPC
Use one VPC for both servers. If you already have a suitable VPC, use it without creating another.
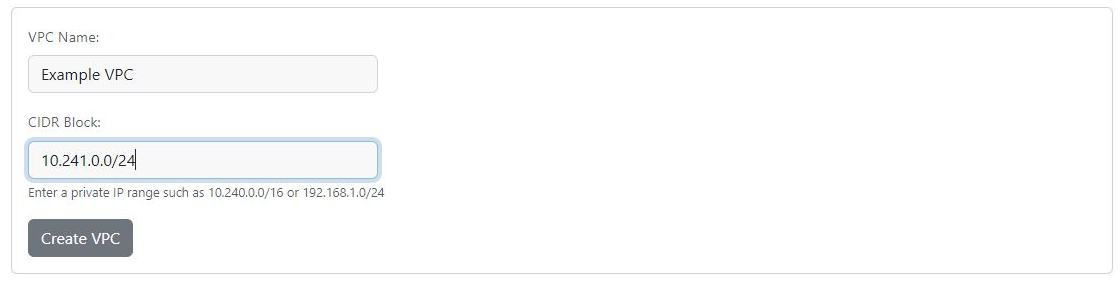
- In mPanel, open Services > VPCs and select Create New VPC.
- Enter a VPC Name and your chosen private range in CIDR Block.
- Check the range, then select Create VPC.
Add your servers
Choose the path below for each server. Selecting a VPC does not remove an existing public IP address, but the way traffic reaches the guest changes with the connection mode.
Create a new server
- Open the server creation page and choose the operating system, region and plan. Choose Ubuntu 26.04 if you want to follow the guest configuration example below.
- Under Configure your server's settings, select your VPC in Network.
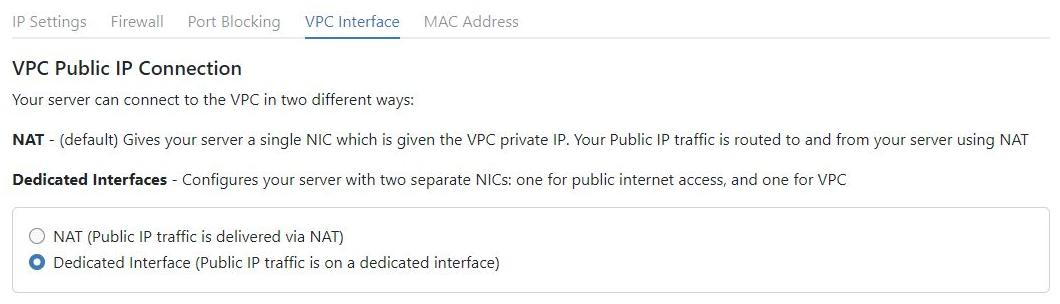
- Under VPC Public IP Connection, select Dedicated Interface (Public IP traffic is on a dedicated interface). Keep a public IP allocation for this guide.
- Leave VPC IP blank to have an unused private address assigned, or specify an appropriate available address in the VPC range.
- Configure your SSH access, review the full order and cost, then create the server. Wait until creation finishes before connecting.
Move an existing server
Move the server first, then enable Dedicated Interface separately. If it already belongs to the intended VPC, skip the move.
- Open the server's Network > IP Settings. Select Join VPC, or Move to another VPC if it is already in a VPC.
- In Change Network, choose the destination. Read the reboot warning, then select Move Server.
- Wait for the operation to finish and the server to start. Confirm the intended VPC under Private Network.
- Open Network > VPC Interface. Select Dedicated Interface and confirm the change if prompted. Allow for another shutdown and start. Skip this step if Dedicated Interface is already selected.
Reconnect using the public IP. Under Network > IP Settings, record each server's private address and netmask. A netmask of 255.255.255.0 corresponds to /24; use your actual prefix if different.
Configure the private interface
Check the guest before adding configuration. Having a private IP allocated in mPanel does not establish that the operating system has configured its private interface.
Run these commands on each server as root, or use sudo where required:
ip -br link
ip -br addr
ip route
resolvectl status
ls -l /etc/netplan /etc/systemd/network
netplan get
Identify the public interface by its public address and default route. In our Ubuntu 26.04 tests it was eth0; the unconfigured private interface was ens4. Confirm your names rather than assuming they match. If the private interface already has the correct persistent configuration, continue to the connection checks.
The following example adds only the private interface. It leaves the existing public-address, default-route and DNS configuration in place. It does not configure routing to other subnets or a VPN gateway.
VPC interfaces require an MTU of 1450. With Split NICs, the public interface can remain at 1500 while the private interface uses 1450. In single-interface NAT mode, the shared interface needs 1450. A VPN carried over the VPC must allow additional room for its own encapsulation.
Protect your connection
Changing network configuration can disconnect SSH. Have the mPanel console available and open a second SSH session before applying changes. Stop if you cannot identify the private interface or if existing files already configure it; do not layer this example over a conflicting configuration.
Back up the existing Netplan directory, then confirm that /etc/netplan/60-vpc.yaml does not already exist:
cp -a /etc/netplan "/root/netplan-before-vpc-$(date +%Y%m%d-%H%M%S)"
ls -l /etc/netplan/60-vpc.yaml
For a new file, ls reports that it does not exist. If it exists, stop and inspect it instead of overwriting it.
On the first server, replace ens4 and 10.241.0.4/24 with its private interface and assigned address/prefix:
netplan set --origin-hint=60-vpc 'ethernets.ens4={dhcp4: false, dhcp6: false, addresses: [10.241.0.4/24], mtu: 1450, optional: true}'
chmod 600 /etc/netplan/60-vpc.yaml
netplan generate
cat /etc/netplan/60-vpc.yaml
On the second server, use its own assigned address, 10.241.0.5/24 in this example. Never assign the same address to both servers. Do not add a private default gateway or DNS servers for this same-subnet connection.
Resolve any generation errors before continuing. Apply and check one server at a time, using a ten-minute confirmation window:
netplan try --timeout 600Leave that prompt open. In your second session, check the private address and MTU, public default route and DNS settings using the commands below. Open a fresh SSH connection to the public IP as well. If the checks pass, return to the waiting prompt and press Enter before the timeout. Repeat on the other server.
ip -br addr
ip -d link show ens4
ip route
resolvectl status
If the checks fail, do not accept. After a timeout or cancellation, verify both the running configuration and the files on disk; do not assume rollback removed the new file. See troubleshooting below before retrying or rebooting.
Check the connection
Once both private interfaces are configured, test traffic in both directions using the peer's private IP.
From the first server:
ping -I ens4 -c 3 -W 2 10.241.0.5From the second server:
ping -I ens4 -c 3 -W 2 10.241.0.4Replace the interface and addresses as needed. With ICMP permitted, expect replies and 3 received. The private interface should show its assigned address and mtu 1450. The route to the VPC subnet should use that interface; the public default route and DNS settings should remain as recorded before the change.
A successful ping proves basic connectivity, not that an application is listening or allowed through its firewall. Test the intended application over its private address separately. A service listening on the public interface remains publicly reachable according to its firewall rules; joining a VPC does not make every service private.
An optional reboot during your maintenance window checks persistence. Reboot one server at a time, reconnect, and repeat the address, MTU, route and peer-ping checks. A reboot is not required merely to apply the Netplan configuration.
Troubleshooting
- No private interface: confirm the server is in the intended VPC, Dedicated Interface is selected, and the network-change operation has finished. Check
ip -br linkfor a different interface name. - Interface present but no address: compare mPanel's assigned address with
ip -br addrand the persistent configuration. Do not change the public interface to compensate. - Ping fails: check both servers' VPC membership, unique assigned addresses, prefix and interface state. Inspect guest and cloud firewall rules without disabling protections broadly. ICMP may be blocked even when an application works.
- Small packets work but larger transfers stall: check the private-interface MTU and any tunnel overhead.
- A
gateway4deprecation warning appears: it may come from the existing public-interface configuration. Do not replace working public networking solely to complete this private-interface task; distinguish that warning from a validation error. - The trial fails or times out: inspect
ip -br addr,ip routeandnetplan get. If this procedure created60-vpc.yamland you need to abandon it, move only that new file out of/etc/netplan. Use the console to validate and reapply the known-good configuration, then check addresses and routes again. Do not remove existing files or reboot with an unreviewed configuration on disk.
Create with the API or CLI
For repeatable provisioning, follow Create a server in a VPC using the BinaryLane API or CLI. It sets VPC membership and Split NICs during creation, with an optional port-blocking setting, then returns to this guide for guest configuration.