
TABLE OF CONTENTS
- Example: recover a VPS with a broken fstab entry
- Boot the VPS into Finnix
- Identify the installed disk
- Run a read-only filesystem check
- Mount and inspect the installed system
- Edit a broken configuration file
- Repair an ext filesystem if required
- Recover from a lost SSH key
- Boot back into the installed operating system
- Other recovery tasks
Use this guide to start a BinaryLane Linux VPS from the Finnix Recovery Live CD, inspect the installed disk and repair a boot problem while the installed operating system is offline.
Finnix is useful when the VPS no longer boots normally, SSH is unavailable, a configuration file is preventing startup, or the filesystem needs to be checked while it is unmounted.
Before you begin: recovery work causes downtime and can cause data loss if the wrong disk or file is changed. Take a backup or snapshot first where possible. Confirm every device name before running a mount or repair command. The VPS operating system remains customer-managed; BinaryLane provides the recovery environment and general guidance.
Example: recover a VPS with a broken fstab entry
In this example, Ubuntu stops in emergency mode because /etc/fstab contains an invalid filesystem entry.
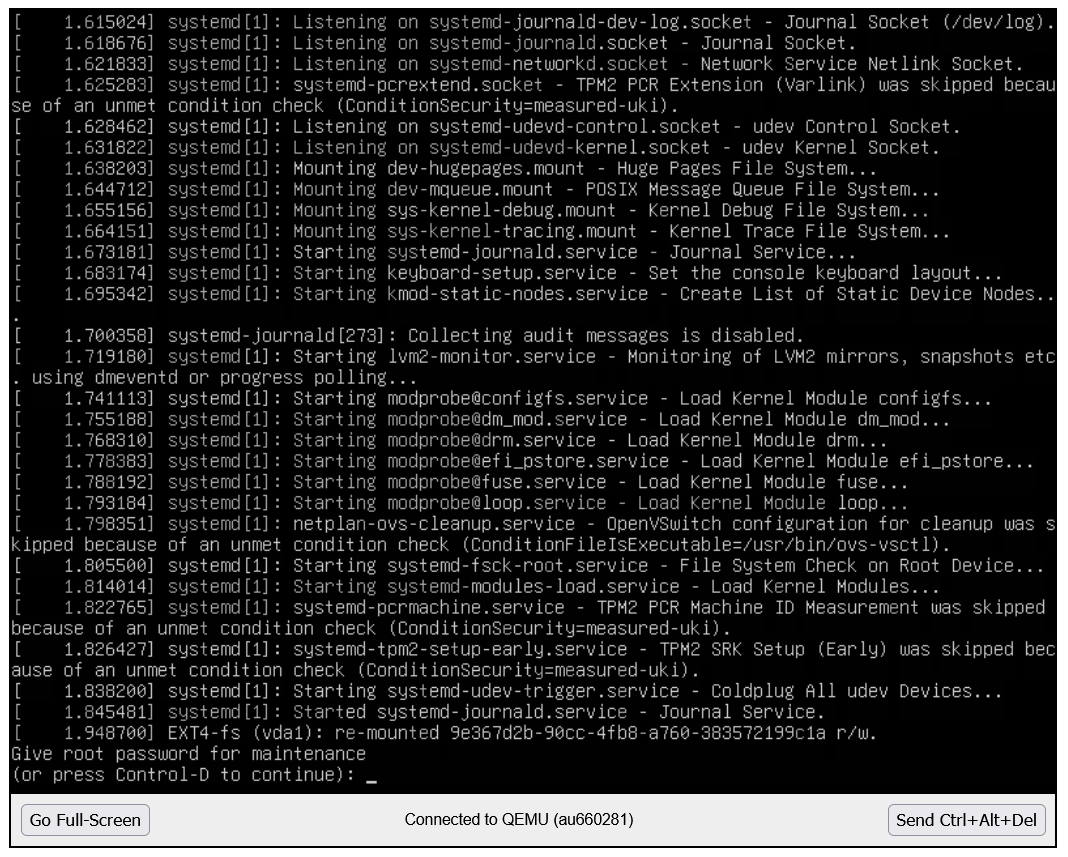
The same workflow can be used to inspect other Linux boot and configuration problems. Replace the example device names with those shown for your VPS.
Boot the VPS into Finnix
- Log in to mPanel and open the affected VPS.
- Select Recovery.
- Open the Rescue Disk tab.
- Select Boot from Finnix Recovery Live CD.
- Select Apply. This restarts the VPS.
- Open the VPS console from mPanel.
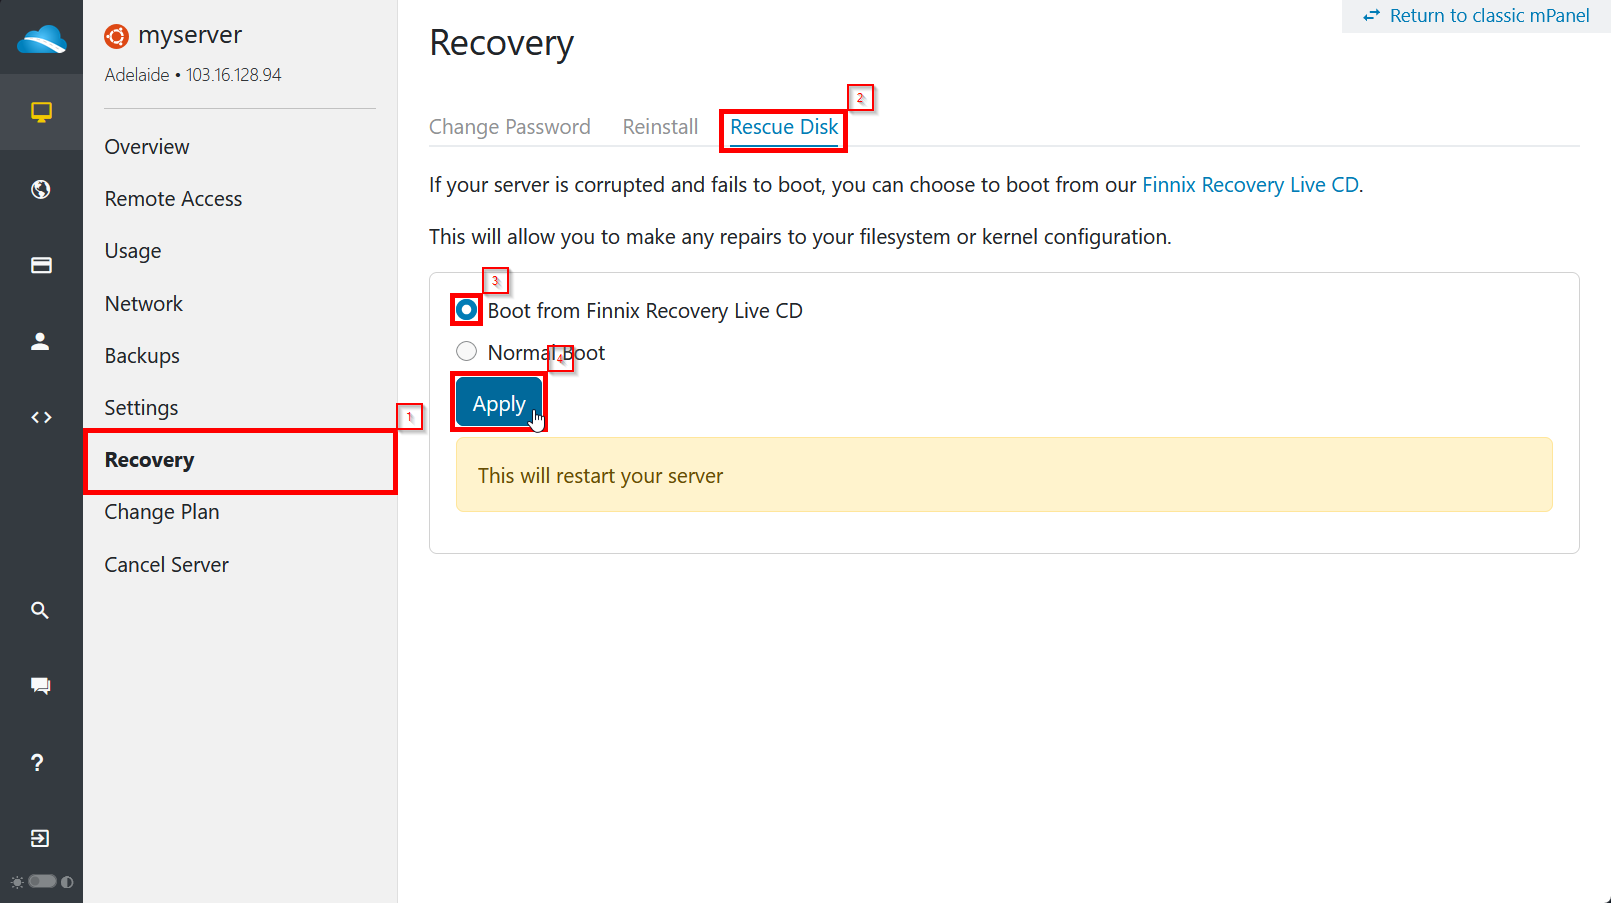
If the operating system does not shut down cleanly, mPanel may offer Continue Waiting, Abort or Force Shutdown.
Continue waiting where possible. A forced shutdown can leave filesystems inconsistent and should be used only when the VPS is unresponsive and you accept that risk.
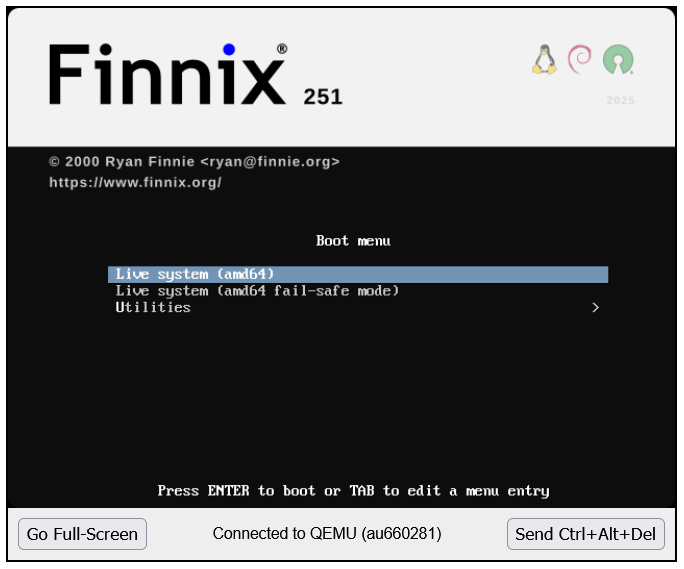
At the Finnix 251 boot menu, select Live system (amd64) and press Enter.
Finnix finishes at a root shell prompt:
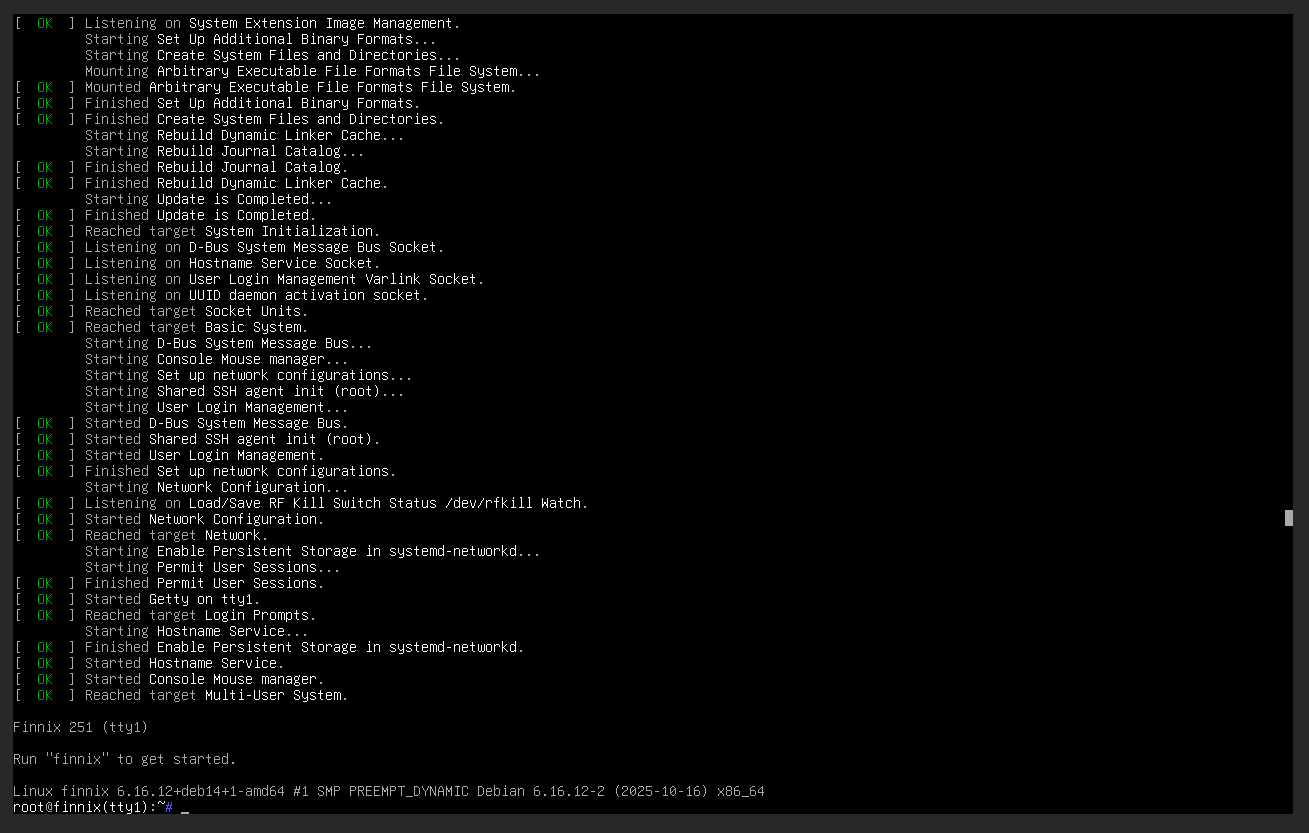
You can confirm the running kernel and ext filesystem tools with:
uname -r
e2fsck -V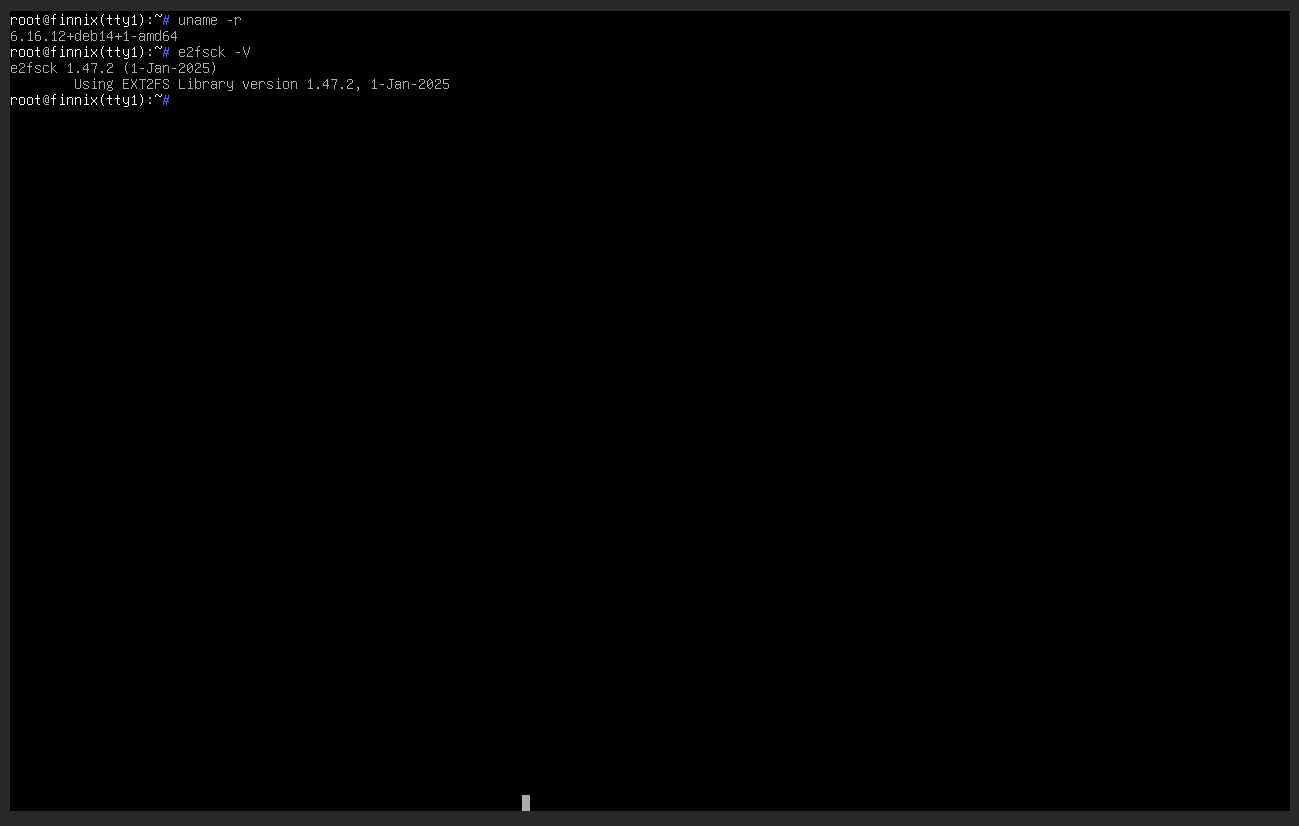
Identify the installed disk
Finnix runs from the recovery CD rather than the installed VPS disk. List the available disks, partitions, filesystems, labels and UUIDs:
lsblk -f
blkid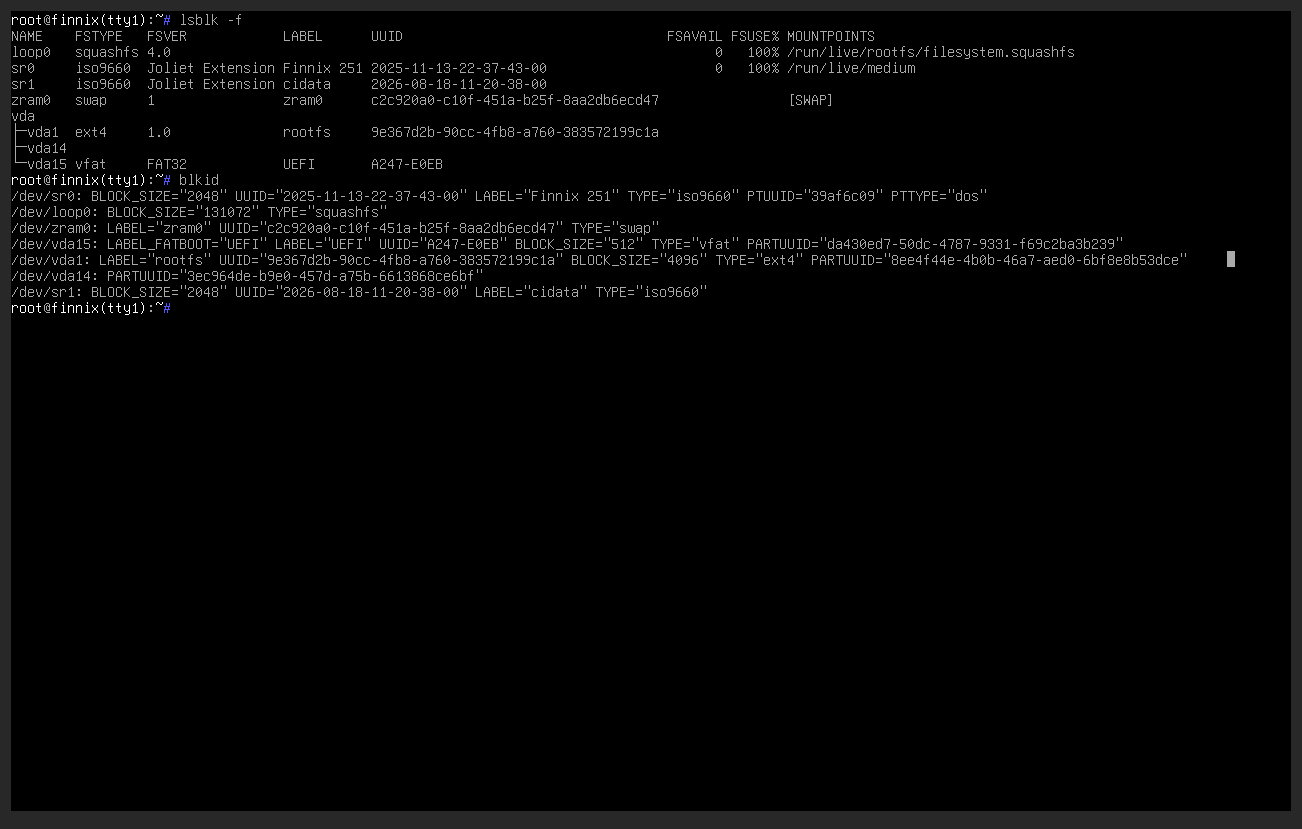
In this example, /dev/vda1 is the installed Ubuntu root filesystem. The sr0 device is the Finnix recovery media. Your layout may differ, particularly if the VPS uses LVM or separate partitions.
Do not continue until you have identified the correct installed filesystem.
Run a read-only filesystem check
For an ext2, ext3 or ext4 filesystem, perform a read-only check before mounting it:
fsck.ext4 -fn /dev/vda1
The -n option answers no to repair prompts, so this command reports problems without changing the filesystem.
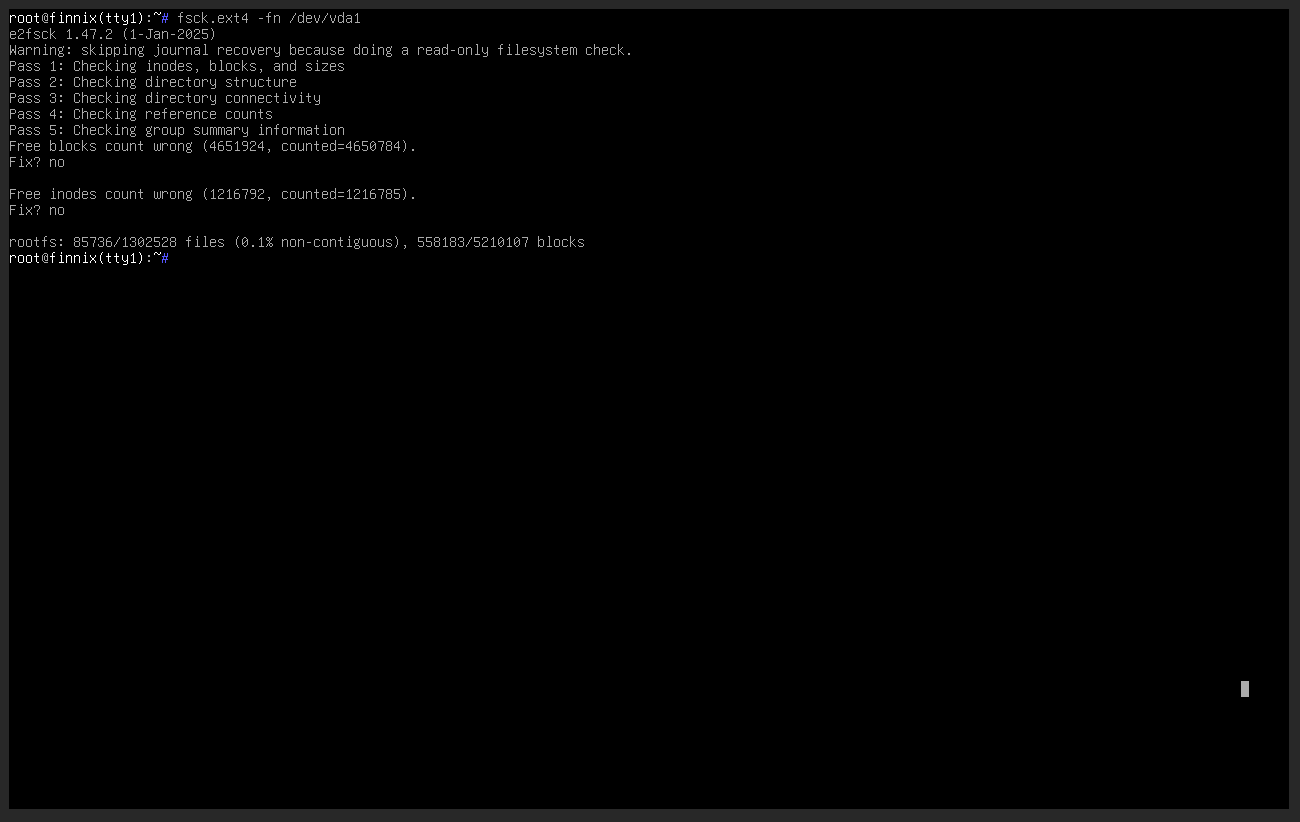
If the check reports errors, review the repair section below before proceeding. Do not run a write-enabled filesystem repair while the filesystem is mounted.
Mount and inspect the installed system
Mount the root filesystem read-only first:
mkdir -p /mnt/server
mount -o ro /dev/vda1 /mnt/server
findmnt /mnt/server
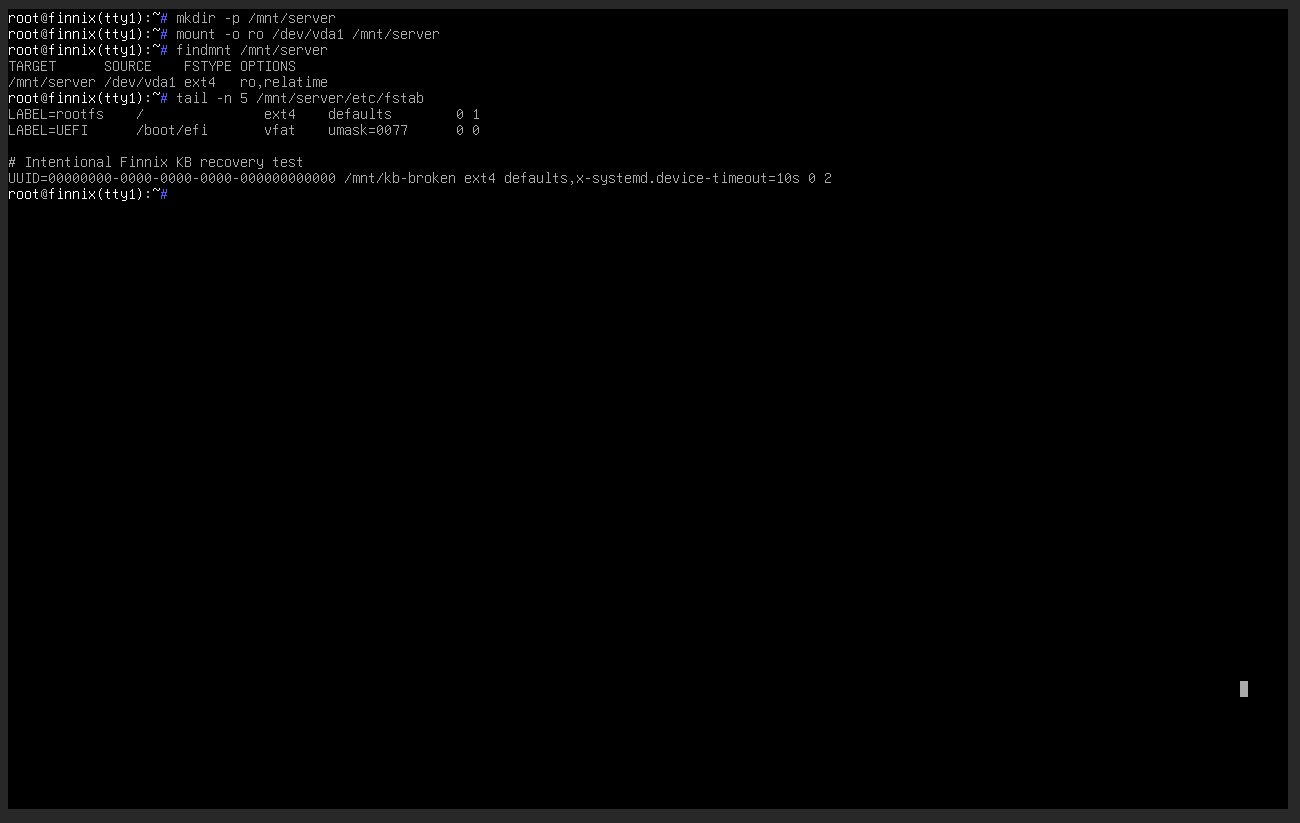
Inspect the relevant configuration file. For a boot failure involving filesystem mounts:
cat /mnt/server/etc/fstab
This example shows an invalid UUID entry that refers to a filesystem which does not exist:
Edit a broken configuration file
Warning: the following steps change the installed operating system. Back up the file before editing it, and remove or correct the entire invalid entry. Leaving a partial line can still prevent the VPS from booting.
Remount the filesystem read-write, make a backup and open the file:
mount -o remount,rw /mnt/server
cp -a /mnt/server/etc/fstab /mnt/server/etc/fstab.before-recovery
nano /mnt/server/etc/fstab
See the invalid UUID:
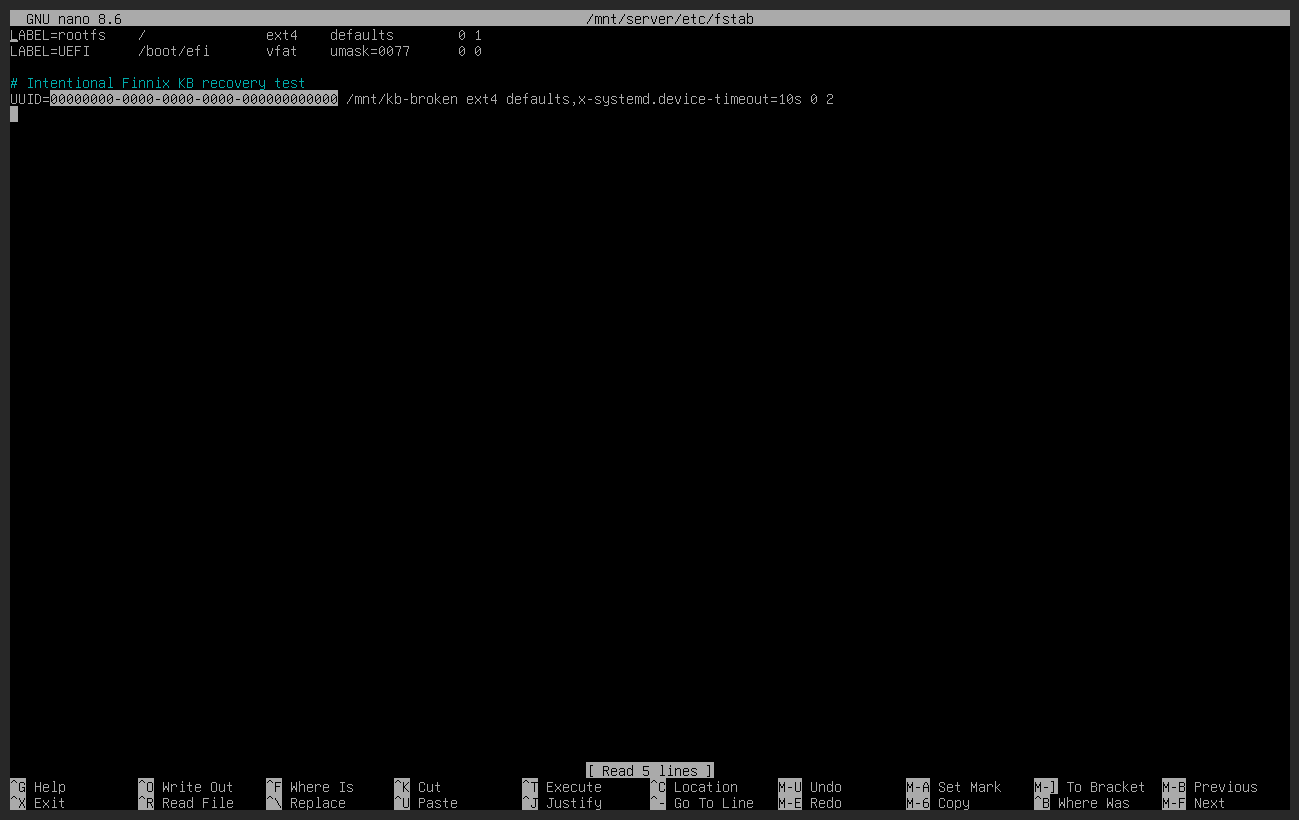
In Nano:
- Locate the invalid entry. Each
/etc/fstabentry occupies one complete line. - If the entry is no longer required, delete the entire line from
UUID=through the final filesystem-check value. Do not remove only the UUID value, as the remaining incomplete entry may still prevent the server from booting. - If the entry is required, replace the incorrect UUID with the correct UUID shown by
blkid. Also confirm that its mount point, filesystem type and mount options are correct. - Leave all unrelated valid entries unchanged.
- Press
Ctrl+Oto write the file. - Press
Enterto confirm the filename. - Press
Ctrl+Xto exit.
Review the saved file before unmounting:
cat /mnt/server/etc/fstab
sync
umount /mnt/server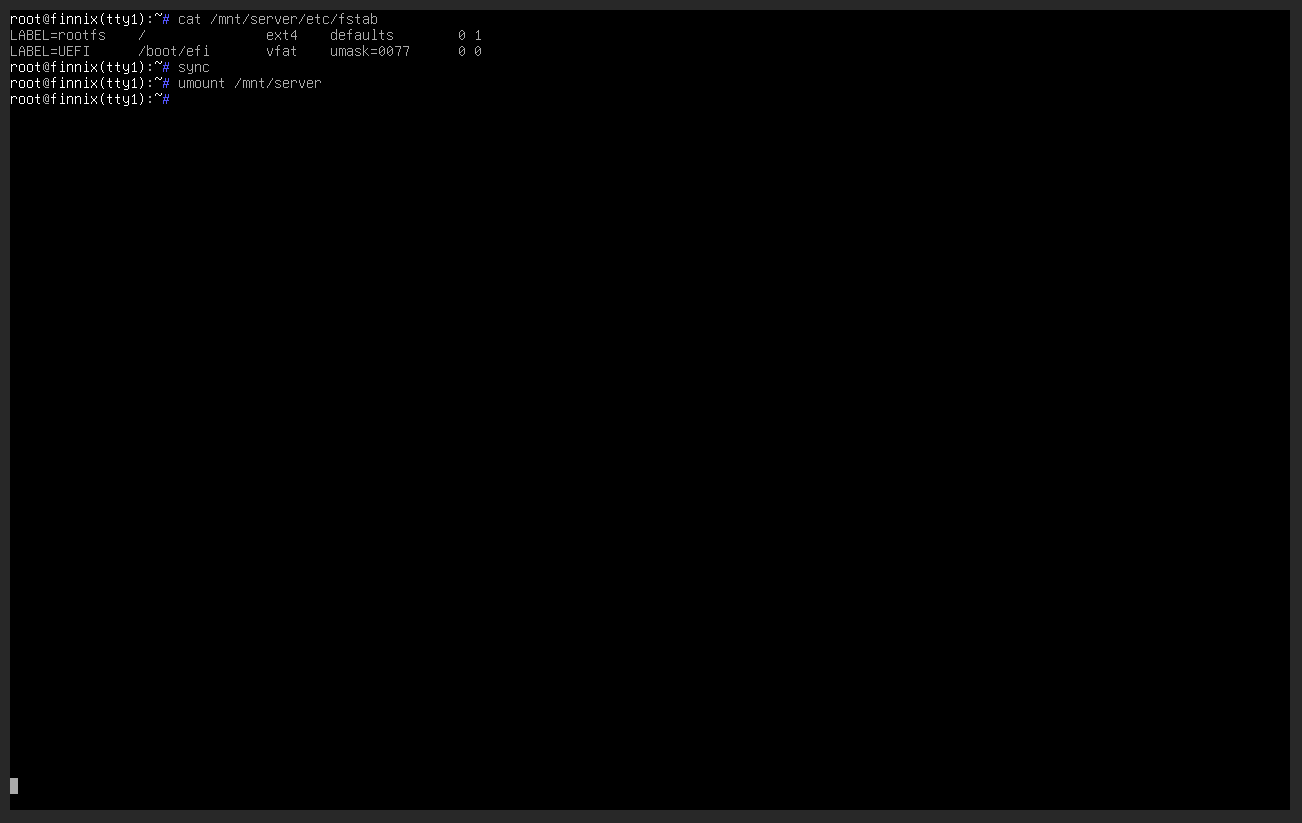
If you need to undo the edit before unmounting, restore the backup:
cp -a /mnt/server/etc/fstab.before-recovery /mnt/server/etc/fstabRepair an ext filesystem if required
Filesystem repair can change disk metadata and may discard damaged data. Take a backup first where possible. Confirm that the target filesystem is unmounted:
findmnt -S /dev/vda1
If this produces no output, run a repair for an ext2, ext3 or ext4 filesystem:
fsck.ext4 -f /dev/vda1
Review each prompt carefully. Replace /dev/vda1 with the correct filesystem for your VPS. Do not use fsck.ext4 on XFS, Btrfs, NTFS or another filesystem type.
Recover from a lost SSH key
If your VPS accepts key-based SSH logins only and the private key or its passphrase is lost, use Finnix to enable temporary password access. The private key cannot be recovered from the public key stored on the VPS.
Important: The BinaryLane Rescue Console does not support clipboard copy and paste. Manually typing a public key is error-prone and is not recommended. Enable temporary password access, boot normally, then add and test a new key over SSH.
1. Prepare the installed filesystem
This section assumes you have identified and mounted the installed root filesystem as described under Mount and inspect the installed system. The examples use /dev/vda1 and /mnt/server; replace the device name with the one shown for your VPS.
If the filesystem is already mounted read-only, remount it read-write:
mount -o remount,rw /mnt/server
If it is not mounted:
mount /dev/vda1 /mnt/server
2. Back up and review the authorised keys
Display the authorised keys for root:
cat /mnt/server/root/.ssh/authorized_keys
Back up the file while preserving its ownership and permissions:
cp -a /mnt/server/root/.ssh/authorized_keys /mnt/server/root/.ssh/authorized_keys.before-recovery
If the private key is only lost, leaving its public key in this file does not provide access without the private key. You can remove it after normal access is restored.
Warning: If the private key may have been copied or compromised, remove its complete line from authorized_keys. Empty the entire file only if none of its keys should remain authorised.
To remove one compromised key, open the file and delete only its complete line:
nano /mnt/server/root/.ssh/authorized_keys
To remove every key for root:
: > /mnt/server/root/.ssh/authorized_keys
If you normally log in with another account, its keys are stored under /mnt/server/home/YOUR_USERNAME/.ssh/authorized_keys.
3. Enable temporary password access
Ubuntu reads OpenSSH settings from /etc/ssh/sshd_config and the drop-in files under /etc/ssh/sshd_config.d/. Add a recovery drop-in that sorts before the existing files:
nano /mnt/server/etc/ssh/sshd_config.d/00-recovery.conf
Add:
PermitRootLogin yes
PasswordAuthentication yes
Press Ctrl+O, Enter, then Ctrl+X to save and exit.
This temporary file overrides later authentication settings without modifying the existing BinaryLane or cloud-init drop-ins.
4. Set a root password
If you do not know a working root password, set one in the installed system:
chroot /mnt/server passwd root
Enter a long, unique temporary password twice.
5. Unmount the filesystem and boot normally
Write pending changes to disk and unmount the installed filesystem:
sync
umount /mnt/server
Continue with Boot back into the installed operating system below.
6. Re-secure SSH after recovery
After the VPS boots normally, connect using the password:
ssh -o PubkeyAuthentication=no root@YOUR_SERVER_IP
Follow Add an SSH key to an existing Ubuntu VPS. Test the new key in a second terminal before continuing.
Disable the temporary recovery override, check the configuration and restart SSH:
mv /etc/ssh/sshd_config.d/00-recovery.conf /etc/ssh/sshd_config.d/00-recovery.conf.disabled
sshd -t && systemctl restart ssh
Confirm the effective authentication settings:
sshd -T | grep -Ei '^(passwordauthentication|permitrootlogin) '
Test the new key again before closing the password-authenticated session. When you no longer need the backup of the old authorised keys, remove it:
rm /root/.ssh/authorized_keys.before-recovery
Important: Leaving 00-recovery.conf active leaves root password login enabled. Disable it after the new key has been installed and tested.Boot back into the installed operating system
- Confirm that any mounted installed filesystems have been unmounted.
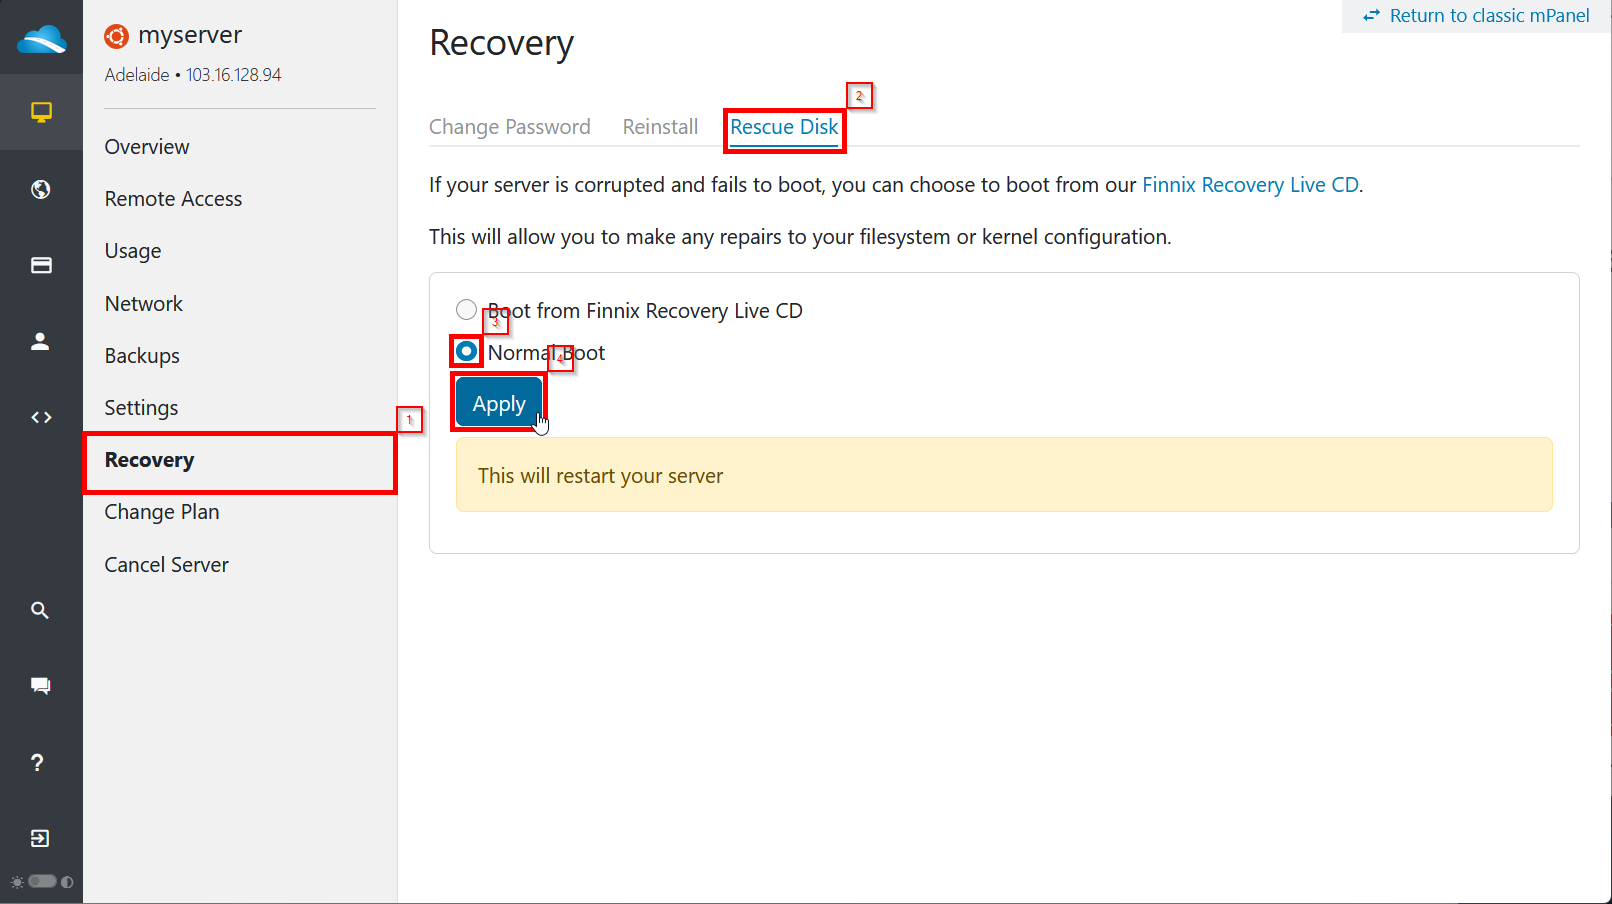
- Return to Recovery > Rescue Disk in mPanel.
- Select Normal Boot.
- Select Apply. This restarts the VPS.
- Open the VPS console and confirm that the installed operating system reaches its normal login prompt.
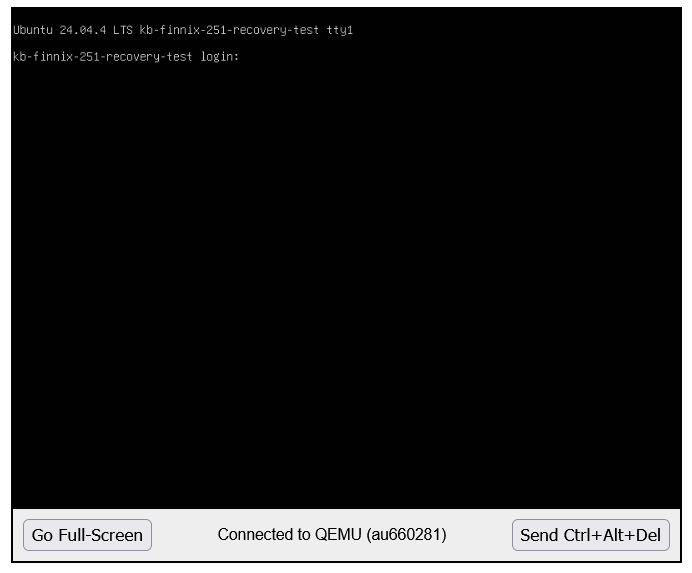
After the VPS starts normally, test SSH or the affected service.
Other recovery tasks
After mounting the installed filesystem under /mnt/server, Finnix can also be used to inspect or repair:
- SSH keys and SSH server configuration;
- netplan and other network configuration;
- firewall rules which block remote access;
- a full root filesystem;
- logs under
/mnt/server/var/log/; and - important files which need to be copied before rebuilding the VPS.
Use read-only mounts while diagnosing a problem, remount read-write only when a specific change is required, and unmount the installed filesystem before leaving Finnix.